Blog
Browse the following articles.
A Vocal Sound
Bass: The body of a track
Prepping a Session to mix - Part III: Editing
In [part I of “Prepping a Session to Mix,”](/2025/02/10/prepping-a-session-to-mix-part-i/) we covered the importance of creating a session template as a starting point where individual tracks are organized, grouped, and prepared to be mixed, and all of one’s tools (reverbs, delays, EQ’s, compressors, etc.) are in place and ready to be utilized. In [part II](/2025/02/17/prepping-a-session-to-mix-part-ii/), we covered analog summing and stereo buss signal flow, how to calibrate, document, and take advantage of analog processing, and how to configure a second computer where the final mixes go through top-of-the-line converters and are recorded at 192kHz and 32-bit float. At this point, all of the software and hardware are ready to go, but there’s still one crucial component to preparing a session to mix that we have yet to cover…and that element is editing.
When I receive a song to mix, I plan on dedicating a decent portion of time to cleaning up the session. The first thing I look to remove from the mixing session is unwanted noise in between the valuable pieces of audio. This could be headphone bleed, room ambience, a player rustling about between sections, etc. One way to remove this undesirable audio is with the strip silence tool in Pro Tools, which is a real timesaver. Another option is to do it by hand, which I prefer to do often to ensure precise edits. I make sure to utilize fade-ins and fade-outs when necessary, and then reconsolidate the tracks.
If a song has real drums, the toms need to be checked for bleed, but like I always say, you can’t be afraid of leakage. Sometimes the leakage between fills actually makes the drums as a whole sound bigger, in which case it wouldn’t need to be removed. However, if the toms are ringing throughout the song or the leakage is generally unpleasant to the overall drum sound, they need to be gated or hand edited to occur only when they’re played. Gating the toms is often sufficient (I tend to use the MH Channel Strip plugin) but at times it’s unnatural sounding and I choose to edit them by hand, which has a smoother sound in general. By the end of this process, the toms should fully ring out and then fade out by the next downbeat or snare hit.
Once the toms are situated, I listen for three issues throughout a song, both globally and on the individual tracks to make sure that nothing is sticking out in terms of timing, inconsistent levels, and tuning.
Timing issues usually occur from an individual instrument straying too far out of time with the drums, or a band playing a part too loose in general, like a section with complicated breaks or a ritardando (*Ritardando - *slowing down gradually) at the end of a track. I usually tighten up these types of edits by hand, but if an instrument is out of time for the whole song or a larger section, I may end up quantizing it to see if it helps (as long as the song is recorded to a click, although it might sometimes work, even if it wasn’t).
Often times, inconsistent level issues happen when an instrument or voice has varying dynamics that move wildly throughout the track, and often occur from poor engineering during the recording process. These issues can be easily fixed by gaining up or down the audio, so there aren’t as many dips and peaks throughout the track. Clip gain is a great feature in Pro Tools for this type of editing. Leveling the severe dynamics keeps the instruments, and especially vocals, sounding more audible and even in the track. If a compressor is engaged, it doesn’t have to work as hard in order to even out the audio.
Tuning issues are usually limited to vocals, but on rare occurrences, can pop up on other instruments as well. I do mostly all of my tuning in Melodyne, as I’ve found it to be the most transparent and versatile of all the tuning software. Once the audio is imported into Melodyne and tuned up, I “commit” the file as a method of printing the tuned audio to a new track. I then drag it to the same track over the original audio, make Melodyne inactive and I’m done.
If I’ve determined that vocals need tuning on a track, I’ll begin with the lead vocal, then move on to the backgrounds and harmonies, so that the secondary vocal parts can be tuned according to the nuances of the lead.
Vocals require a few aspects of editing that don’t apply to other instruments; those are plosives and breaths. Plosives, or pops, are easily corrected with a high-pass filter. If that doesn’t do the trick, you can always hand edit them. I process them with the Fab Filter Pro Q-3 with the high-pass filter set at 115 Hz and a 12dB per octave ratio. If hand editing, I’ll made an edit before the pop and fade into it, moving the length of fade farther in until the plosive isn’t noticeable anymore.
Breaths are usually desirable on the lead vocal track, but I always remove them from a double vocal and often remove them from the harmony and background vocal tracks so that they don’t get in the way, and this keeps the track clean as well.
If harmony, backgrounds, or double vocal tracks seem too loose, I’ll duplicate the playlists in order to preserve the originals. Then I use Synchro Arts - Vocal Align Pro 6 or Revoice Pro to tighten them up with the lead vocal or to the voice singing the melody part if there’s no lead vocal in a particular section.
The final step before beginning the mix is to set the fade-outs on all of the tracks at the end of the song, and determine the exact spot that the song ends, remembering always to keep the fades sounding natural.

Prepping a Session to Mix - Part II
In [part I of “Prepping a Session to Mix,”](/2025/02/10/prepping-a-session-to-mix-part-i/) we discussed my template mixing session layout in Pro Tools, how I organize and prepare individual tracks for mixing, and how important it is to have a starting point for mixing so the process is as streamlined and straightforward as possible. Now that we have the mixing session set up properly, we can move on to part II of the pre-mix process: calibrating the mixing system and outboard gear, as well as preparing a second Pro Tools session on our designated mix computer where the final mixes will be recorded.
Calibration and documentation are two essential elements when utilizing outboard gear in the mixing process. I’m able to calibrate my analog mixing signal chain to an accuracy of 1/100th of a dB, which is critical for creating a perfectly balanced mix and for recalling a mix later down the road. Documentation is equally important in recalling mixes, so I make sure that any changes to standard calibration, as well as all use of outboard processing, are noted. To get a handle on how I calibrate my mixing system, I’ll begin by briefly recapping my signal chain from my original Pro Tools session to a second Pro Tools session on my designated mix computer.
I use 32 D/A outs from PT, 1-16 through an Apogee DA-16X and 17-32 through an AVID HD I/O, that go to 2 Roll Music RMS216 Folcrom Passive Summing Devices where the 32 channels get summed down to two channels and go through a pair of JCF Audio LEVR’s (they are summing amplifiers Josh Florian designed and incorrectly spelled as did the Folcroms were misspelled) as a gain stage for the level reduction created by the passive summing device, then the stereo signal goes to my JCF Audio (Josh Florian) Latte 2-channel A/D D/A converter which is AES out to yet another Avid HD/IO, where the audio gets converted back to digital and recorded to a separate PT session at 192kHz and 32-bit float on my mix computer.
Throughout this signal chain, there are two stages that need to be calibrated: the pair of JCF Audio LEVR’s and the JCF Latte. I check the calibration by sending a 1kHz sine wave at -18dB out channels 1 and 2 of Pro Tools on my original computer, which goes through the Folcroms and then the LEVR’s. I read the output of the LEVR’s with my Fluke multi-meter (Fluke 189 • True RMS Multimeter) set to the DB scale and make sure the level is set to +4dB. I also make sure my analog VU meters read this signal as exactly 0dB. For calibrating the Latte, I send the same 1kHz sine wave at -18dB out of PT on my mix computer and check the output of the D/A on the Latte to make sure it is also +4dB.
Calibration also allows me to customize my various compressors for individual instruments. For instance, one of my API 525 compressors is set up for lead vocal, another 525 is set for acoustic guitar, my Universal Audio 1176 is set for electric guitar, and so on. This way, when I patch the lead vocal into my vocal-designated 525, there’s a 95% chance that it’s hitting the compressor just the way I like. If I need to make any adjustments, I make sure to document them after the final mixes have been recorded so that I can recall the mix perfectly if need be. All of my documentation is done in “Teaboy.”
Compressor calibration process is a useful skill for any engineer utilizing outboard compression. Buttons, switches, and detented knobs on outboard gear are easily documented, but when it comes to recalling the settings on a compressor with continuously variable knobs, it’s a bit trickier. Here’s a brief description of how I calibrate the input and output levels on an API 525.
I begin by putting the ceiling at 10 (I’ve found 10 gives a good healthy signal and it’s important to use the same setting every time) and all other settings where I normally use them, compression mode (2:1) and release time set at its fastest (0.1 sec). Then, I send a 1kHz sine wave at -18dB to the compressor, set the output knob to max, and read the output level of the compressor with a Fluke multi-meter set to the DB scale. This gives me a value that represents the level of the input knob, since the output is maxed out and serves as a constant. I adjust the input knob until it matches my designated input calibration level and now the input knob is set. Next, I begin to lower the output knob until the combined level of the input and output knobs match my designated combined calibration level.
If you need to document the input and output knob levels, perhaps because the settings were changed at some point, then the process is reversed. First, you’d notate the combined level and then max out the output knob to get a reading on the input level.
At this point, all calibration is complete. My analog mixing system is dialed in, my customized compressor settings are in place, all of my EQs are zeroed out, and my main VU meters are calibrated to zero. Now it’s time to set up the session on my mix computer.
I create a blank session at 192kHz and 32-bit float and create a stereo auxiliary input track with a set of Dorrough meters on it and a stereo audio track where the final mixes will be recorded. Then, I make sure to set the tempo, meter, and grid resolution to the same settings as the session from which I’m recording. I also make sure in the “Session Setup Window” that the Start Time is: 01:00:00:00 and the Pan Depth is: -2.5 and the sample rate is 192 and the Bit Depth is 32 Bit Float. To link my main Pro Tools computer to the mix computer, I connect the two as satellites via Ethernet cable. WiFi capability needs to be disabled and Ethernet enabled on the mix computer in order for this to work. Once the two are connected as satellites, I check to make sure that they are synced together properly. To do this, I click on different memory locations on the original computer to make sure that the bar/beat locations match up perfectly. When all of this has been checked, I set up the version playlists that I will be making of the variations of the mixes. Over the years, I have come to realize that 7 versions are necessary, and they are as follows:
T1 – Final Mix: full track with all vocals and instruments T2 – Lead Vocal + 0.5dB: final mix with lead vocal up 0.5dB T2b - Lead Vocal - 0.5dB: final mix with lead vocal down 0.5dB T3 – Lead Vocal A Cappella T4 – Background Vocals & Harmonies A Cappella T5 – TV Track: full track with BGVs but no lead vocal T6 – Instrumental: no vocals or BGVs
On Mixs T1 T2 & T2B I use the Volume Trim mode to adjust the level + or – ½ db and that way it still follows the automation rides.
Once these are in place, I switch back to playlist T1, set the stereo audio track to input monitoring, and monitor from mix computer.

Prepping a Session to Mix – Part I
Mixing a track is an invaluable engineering skill and it takes thousands of hours to develop the proper skills and ear training to get a handle on it. We’ll certainly get to my method of mixing in future blog posts, but equally important to the mix itself is the work done in preparation for mixing. The audio must be clean with no pops or added noise, all the editing should be out of the way so there’s no worrying about missing crossfades or notes out of tune or out of time, and the session should be set up in such a way that makes the final mixing process as simple as possible. The blog post within is a discourse on how I prepare a session to mix.
The easiest sessions for me to mix are the ones that I’ve tracked myself, as my workflow through the tracking process is implemented with the final mix in mind and the session is already set up the way I like it. But for the purpose of this blog, we’ll use an instance where I’m receiving a client’s recording in the form of stems. That way we can cover all the bases.
I begin by importing the stems along with the client’s rough mix into my mixing template Pro Tools session that has all of my auxiliary channels (i.e. reverbs, delays, drum buss, etc.). I put all of the stems on mono audio tracks so that I can balance the levels of stereo information. The left and right mics on overheads and high and low mics on piano, for instance, are usually not even. I select “all” in the group window so I can move all of the tracks together and everything stays in relative place.
If the tune was tracked to a click, I set the tempo and place the downbeat of the first bar at the top of bar 1, usually with two bars of space beforehand so that the grid begins with bar -1. This space at the front isn’t crucial for the mixing process, but I use two bars as a rule of thumb so if the song has a pickup, you still get a full bar of count in before the bar with the pickup. I make sure the drums, as well as the track as a whole, are lined up with the grid. Once everything’s in place, I listen to the client’s rough mix from start to finish, putting markers in place along the way to dictate the structure of the song (i.e. Intro, Ver 1, Pre Chr 1, Chr 1, Reintro, etc.). I also put in the memory locations a MIX & a MIX PIP. Incase you’re wondering what a MIX PIP is, it’s the usual mix length and I ad a16th note distance on the grid in front of the intro with a tone that makes a beep so that all the mix’s have this and different mixes can be lined up exactly if need be.
Now that the stems are imported and the song is lined up with the grid, I begin to organize the session by color-coding instruments, putting them in order, setting approximate levels and proper panning, adding plugins and sends, creating groups to link corresponding tracks (i.e. drums, kick in/out, snare top/bottom, bass di/amp, strings, harmonies, vocals), and setting outputs for each track. I utilize 32 D/A outs from Pro Tools, 1-16 through an Apogee DA-16X and 17-32 through an AVID HD I/O, that go to 2 Roll Music RMS216 Folcrom Passive Summing Devices where the 32 channels get summed to two channels and go through Josh Florian LEVR transformer line amps as a gain stage for the level reduction created by the passive summing device, then the 2 channels go to my mastering ProTools HD Native system.
Below is a chart that documents my default Pro Tools pre-mix setup. You’ll notice that the whole mix is set up to be mixed in the box, but as I come across tracks that will benefit from outboard processing (such as kick, snare, acoustic guitar, lead vocal, etc.), I pull the plugins and patch in the gear.
All of the inserts that I put on tracks have default settings that are zeroed out. The compressors need dialed in so that they’re hitting at the right amount (usually around -3 to -5 dB) and all of the EMT 140 & ALTIVERB sends set around -22.4 dB. This is just a starting point, but it’s a great place to begin a mix.
The Val Garay Method on Recoriding Guitar - Part I:
The guitar has been an essential part of popular music for some time now, and its significance in the evolution of songwriting, band instrumentation, and production over the past 60 years or so is undeniable.
Most bands today have one or two guitarists, and in the recording process, both acoustic and electric guitars are often utilized. This makes the recording of guitars a vital tool for any engineer. I have a method that I’ve developed for recording guitars over the last 50 years that I believe is foolproof.
**ACOUSTIC GTR** I utilize a simple two-mic system on the acoustic guitar that I’ve found reproduces the guitar extremely well across all styles and dynamics from finger picking to full on strumming. The first mic is the infamous C12A by AKG, a large diaphragm tube condenser mic that is shaped like a C414, but is tube-driven like the original AKG C12’s. This mic has incredibly low distortion, a frequency range spanning 20Hz-20kHz, and a built-in bass roll-off, all of which are great features when considering a mic for acoustic guitar. Another fantastic option is its successor, the AKG C414; it has comparable specs and is significantly more affordable. I place this first mic about six inches out in front of and centered over the sound hole of the guitar with a bass roll-off on at 40hz to remove unwanted boominess.
The second mic is one of my favorite secret weapons; you may remember it from my earlier entry on drums as a hi-hat mic. It’s the Sony ECM-50 or ECM-50PS lavaliere condenser mic. The PS stands for power supply, meaning that it can run on phantom power (the original version is battery powered only). I clip this mic to the sound hole, about 45 degrees from the fingerboard, over a strip of console tape so it doesn’t damage the wood with the mic facing upward on the outside of the guitar at about a 45 degree angle or say at 10 o’clock.
I run both microphones through a signal chain that emulates an API console, starting with two BAE 312A mic preamps, which are Brent Averill’s version of an original API 312A. These pres utilize Avedis’ 1122 op-amps and I consider them the best modern mic pre’s on the market. Out of the mic pre, I run the C12A/C414 through an API 525 in compression mode with ceiling at 4 and the input around 10:30 and the output around 2:30. The compression switch in and both attack switches in the out position (fastest). The 525 is a fast compressor and does an incredible job of keeping the acoustic guitar level throughout the track. This is a characteristic that you will come to praise in the mixing process, and nothing beats the warmth and size of analog compression on the way into the digital domain. The ECM-50PS doesn’t get compression. Then, each signal goes through an API 550A for further shaping. The C12A/C414 usually gets a boost of 4 or 6dB at 10 khz on a shelf, +2db @ 3k that is a peak to bring life and shine to the high end. As the gain of a shelf on a 550A is increased, the frequency range extends lower, so 10k will end up affecting frequencies all the way down to 2khz. The ECM-50 can get a reduction of 2dB at 50 Hz on a peak to remove unnecessary boominess if it sounds like it does otherwise I leave it, and a boost of 2 to 6dB at 15 kHz on a shelf to add air to the top end. I then check phase between these two mics and make sure the phase is correct.
I utilize the C12A/C414 as the main mic and blend the ECM-50 until it’s characteristics are supportive, but not overwhelming, as the ECM-50 doesn’t stand alone as an acoustic guitar mic. I’ve found that the individual qualities of these two mic’s, when blended properly, complete the natural sonic spectrum of the acoustic guitar. I bring the signals up on two auxiliary channels in Pro Tools, balance them there, and then sum them to a single record-armed audio track. This forces you to get the blend right during the recording process. I’ve found it important as an engineer and producer to trust your ears and commit to what sounds right. Decisions left as options during the recording process will stack up as too many possibilities and uncertainty in the mixing process. The closer the acoustic guitar sounds to the finished product in recording, the better it’ll sound once mixed.
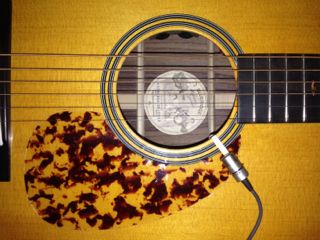
Below is a picture of my Blueridge Lonesome Pine Fiddler’s 70th Anniversary acoustic guitar all mic’d up.
The Control Room
- Speakers at least 2 feet off the wall and 12 feet from the back wall
- Live/Reflective in front of you, dead behind you.
- Never make a room too dead. Needs to have some reflection.
- Rug to isolate sound beneath you
- Isolation between the speakers and whatever they sit on. (console or stands that attach to the console)
- Composition of the baffles behind you that the speakers are facing.
- Pegboard
- Hard compressed fiberglass bats (Owens-Corning 705 • 2 X 24 X 48)
- Soft fiberglass (R13)
- Felt covers
- Using multiple monitors
- Tannoy SGM 10B/W Mastering Lab Crossovers
- Powered by Bryston 4-BST
- ATC SCM20PSL
- Custom Made NS-10’s
- Powered by phase linear 400
- Consumer speaker, I use a Beats by Dre • Beatbox
- Tannoy SGM 10B/W Mastering Lab Crossovers
- Using a sub to extend low frequencies
- Infinity BU-2
- Crossover at 80hz (get to a good starting place and find where it sits right with your speakers)
- Infinity BU-2
One of the most important aspects of recording is having a good listening environment. Since tracking, mixing and most other aspects of music production require you to rely on your ears, it’s best to have a listening space where what you’re hearing is an accurate representation of the sounds you‘ve captured. Tracking and mixing in such a listening space will mean that your mixes will translate better onto other systems, as having problems with acoustics in your mixing environment (such as nodes, comb filtering problems etc.) can cause you to misjudge what your mix needs as far as balance, EQ and more. You may be wondering what “secrets” I’m going to dish out to you in this post but let me forewarn you: there are no “cure-alls” for acoustics in a recording or listening space. Acoustics is a complicated field, and I certainly don’t intend to discuss all the nuances of properly tuning a room (as that could go on for hours).
However, I do intend to describe my listening space for you, which will give you some good rules of thumb about acoustic treatment, speaker placement and so on.
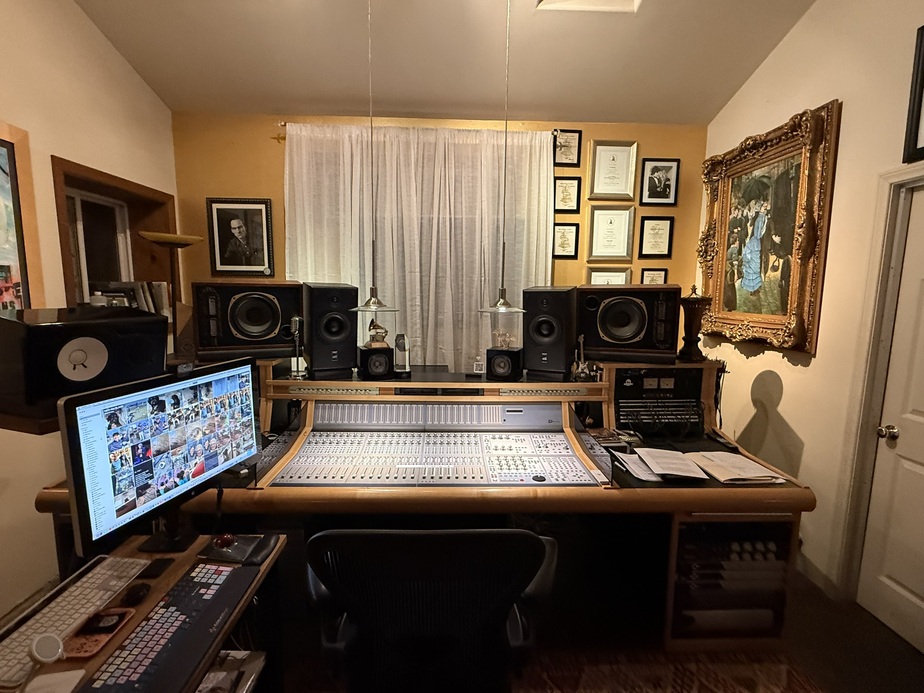
First and foremost, you want your listening space to isolate how much sound is going to reverberate around your room. Surfaces like concrete, stone etc. will enable the most reflections and will need to be treated differently than drywall or wood. My mixing space is made of a slanted room with a drywall and a stone floor. You will want to make sure that your mixing space is open in front of you and deader (having more absorption) behind you.
This way, with some reflection in front of you there is some ambiance coming at you. I also advise using a rug to isolate the sound that may reflect off the floor. As well as this, you will want material to isolate your speakers from their stands, which will catch early reflections. I use Auralex Propads for my ATCs and Primacoustic’s for the Tannoys.
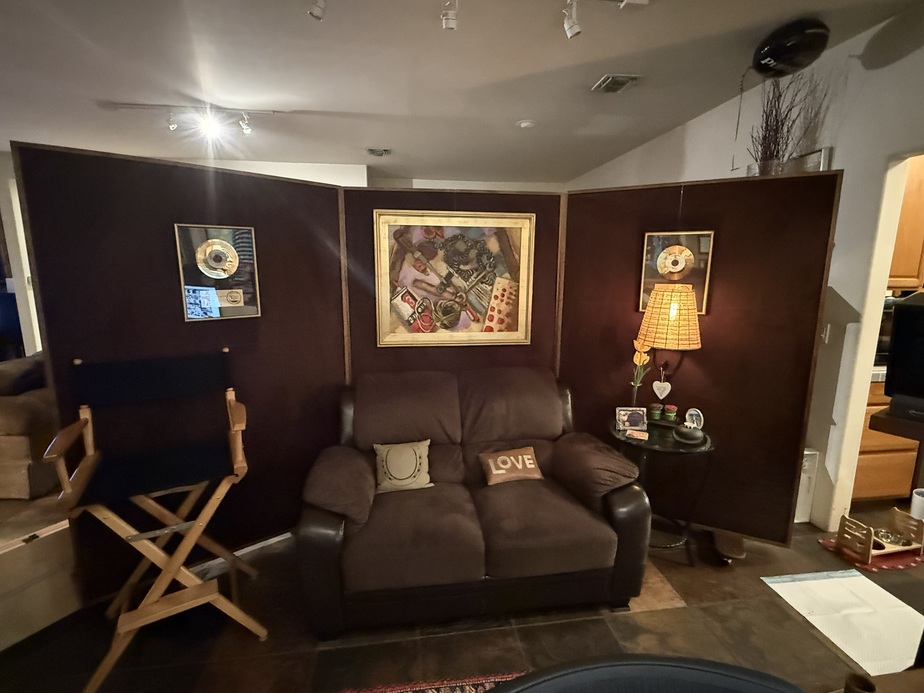
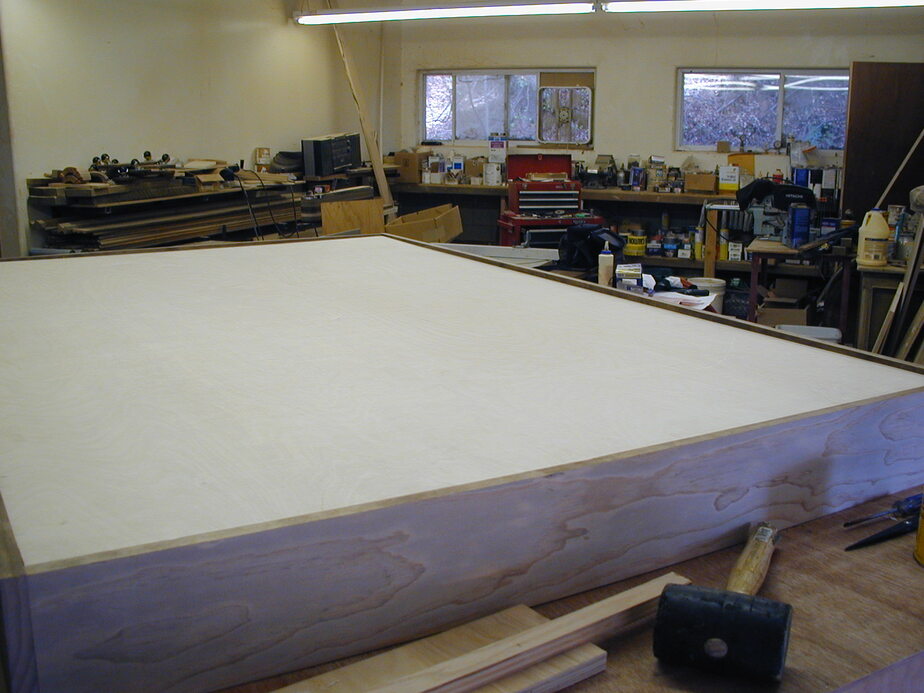
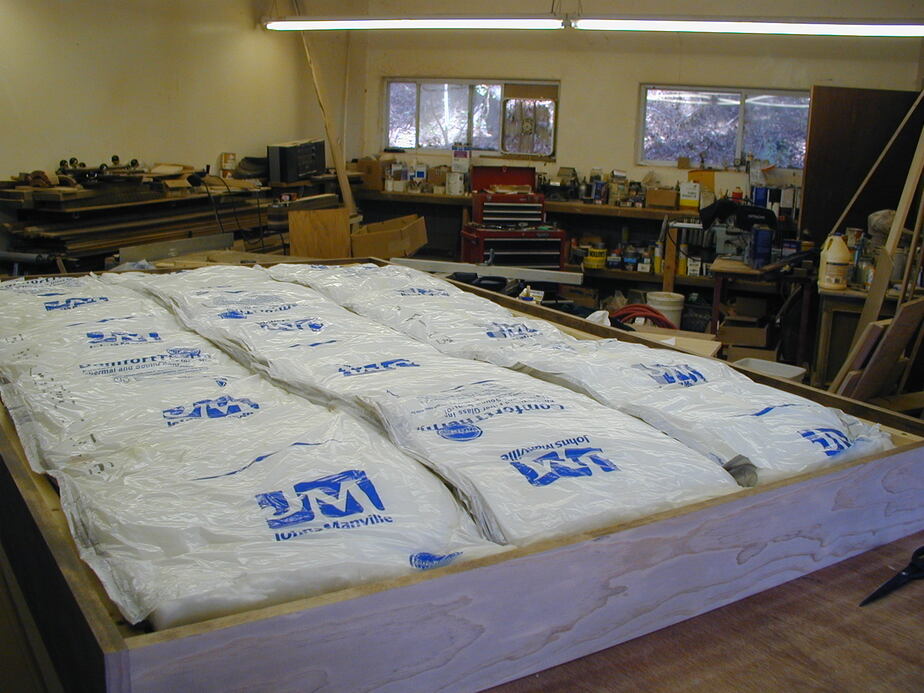
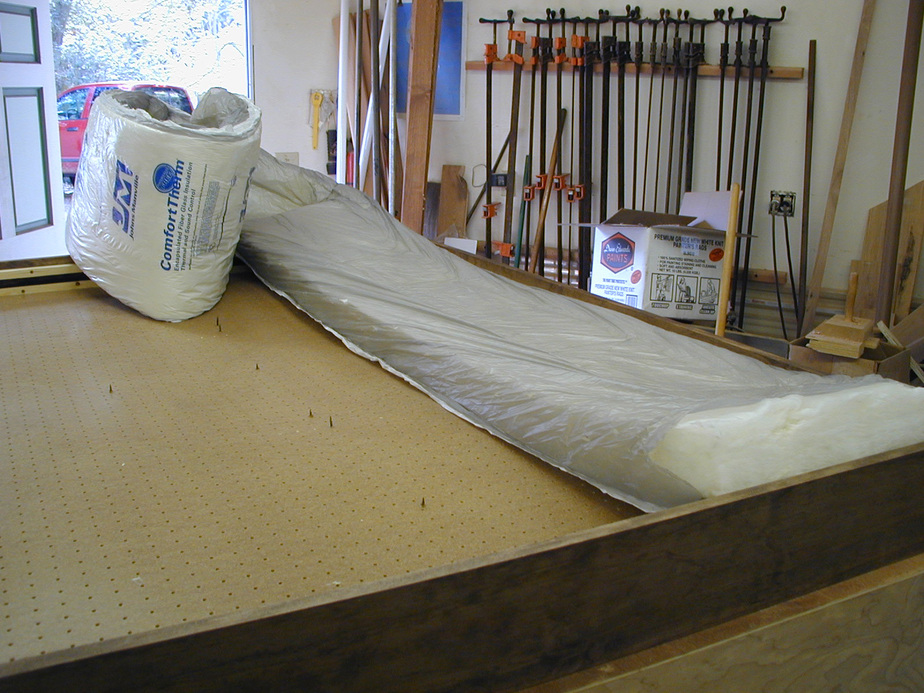
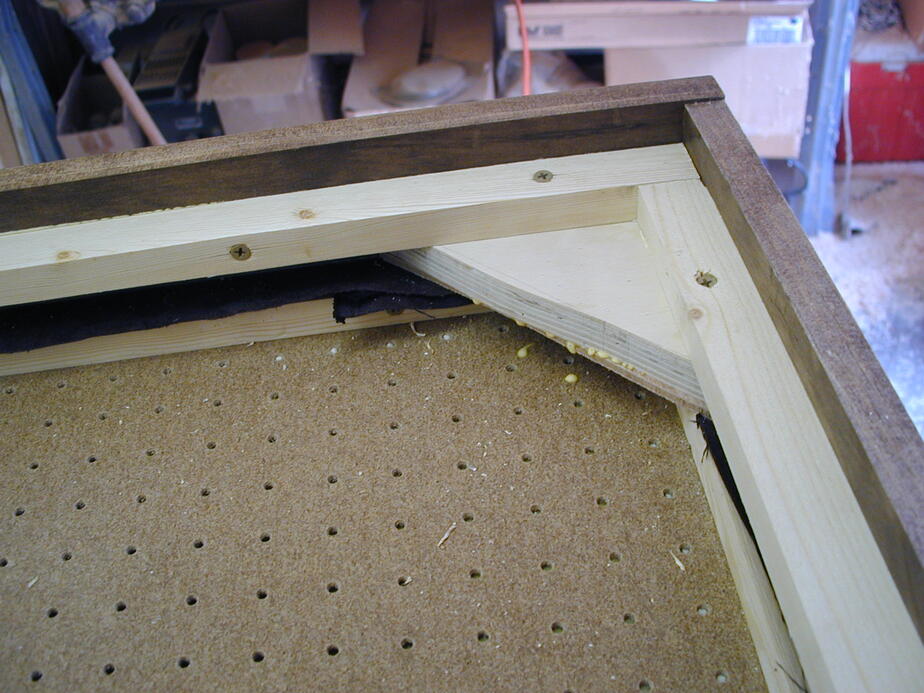
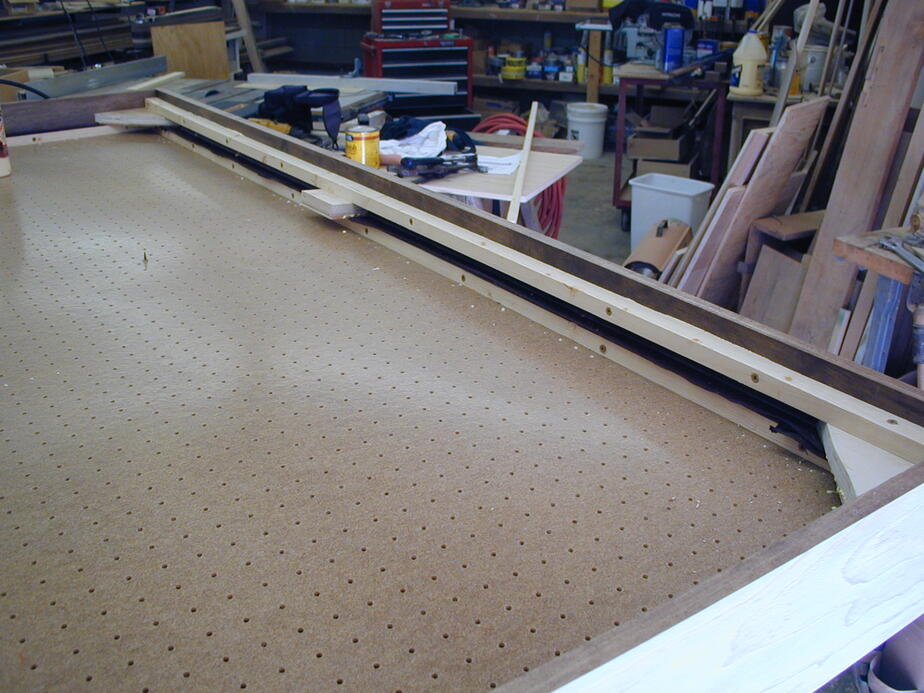
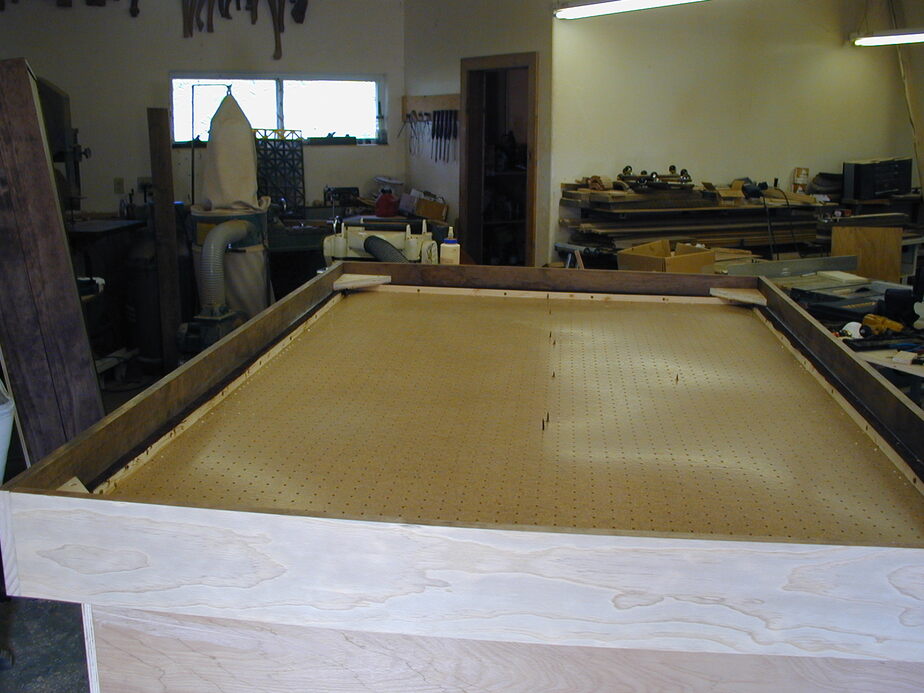
My personal technique for room placement with speakers is to have the speakers at least 2 feet off the wall in front of you and at least 12 feet from the wall behind you. It’s important to make sure that your speakers aren’t too close to the front wall because this will cause boundary effects, meaning that as you move speakers closer to the wall behind them, the early reflections add to the source and create a boost in the lower frequencies. I have found over the years that the 12 feet behind you gives you the proper time for anything that’s going to come back at you does not. Because the room I mix in is large, I’ve isolated a space in it with a false back wall made out of three baffles. They are composed of pegboard, hard compressed fiberglass bats (Owens-Corning 705 • 2 X 24 X 48), and Soft fiberglass (R13). These materials are enclosed in a wooden box on wheels with felt covers (photos included below).
Monitoring on multiple sets of speakers is important too, as this is another good indicator of how your mix will translate to different systems. In my setup, I use a pair of Tannoy SGM 10B’s powered by a Bryston 4BST as mains, ATC SCM20PSL’s powered by a Bryston 4BST as alternates, and my custom enclosure and modified crossover NS10’s are powered by a Phase Linear 400 as smalls and the custom Auratones by CK Speaker . When using unpowered speakers, choosing the right amp is an important decision. You need to make sure that not only does the amp you’ve chosen have enough power, but does it also sound good or is a “good match” for the speakers you’re using. Although amp and speaker pairings are somewhat of a preference, I personally recommend Bryston amps and Phase Linear if you can find them, as they sound good on pretty much anything. You want to make sure that each pair of speakers is placed as an equilateral triangle to your position. (so the centerpoint is at ear level where you sit at the console) I also use an Infinity BU-2 subwoofer, which gives me a more accurate depiction of the lower frequencies in the spectrum.
I hope that a look into how I set up my listening space will point you in the right direction for tuning your room and setting up your speakers. Which speakers do you use? Do you have any other tips for basic room acoustics?
Below are the pictures of my control room as well as the pictures of the construction of my baffles. If you have any other questions about control rooms or my baffle composition, feel free to add them in the comments section.
|
|
|
|
|
|
|
|
Drums: The Skeleton of a Track – Part II
In part one of [Drums: The Skeleton of a Track](/_posts/2025-01-01-drums-pt1.html), we discussed recording techniques utilized during the drum tracking process. In this entry, we'll move on to mixing. I make sure to keep the mixing process in mind throughout tracking; this allows for maximum efficiency, as the drums are generally in place as we move on to mixing. At this point, the tracks should be balanced with proper panorama (panning). I always begin with the faders in Pro Tools at preset levels. The kick at 0dB, while the snare is at -2.5, and the toms, hat, overheads and rooms are at -10. I find that this is a good starting point for the drum mix, as these levels are approximately where I start and end up balance-wise. They will, however, change slightly throughout the mixing process as I always try and balance things to tape (although in this case it’s no longer tape but Pro Tools). I set and balance the input signals via mic pre gain, and if I’m mixing on a large format console, I’ll also use the onboard automation to ride faders for important dynamic changes such as solo sections, fade outs, etc. I prefer metering the input signal on VU meters verses digital meters if possible, looking for 0dbm signals for kick and snare, with the toms peaking around +1 to +3 dB (as long as they aren’t peaking in Pro Tools). Hi hat around -10 and overheads normally around -7 dB. It's important not to rush the balancing process: how you set with drums in this part of the mix will affect how you blend the rest of the tracks together, so take your time. I always spend time listening to the drums to make sure they have a great balance (nothing should be sticking out too much) and are in phase. Phase issues are especially important for the hat and overheads. This can be checked by A/B listening in and out of mono. If the cymbals sound muffled or off in some way, they may be out of phase. Also, of major import I always have the drummer play straight time without the hi hat and in the overheads the snare MUST appear exactly in the center of the stereo image. Then I have him play time with the hi hat and I add the hi hat mic and balance it taking it in and out until I get the desired presence I like. All in all, when I listen to the drum mix, I like it to sound the way it would if the drummer were right in front of me: huge, punchy, open, and natural. When panning the drums, my rule of thumb is to use the audience’s perspective, which would be how the kit would sound if you were listening to it at a live show. This means the kick and snare should be in the center, with the high rack tom and hi-hat on the right and the floor tom and ride on the left. The overheads should be panned so that snare is dead center. For panning the hi-hat, I listen to the overheads with the hi hat track muted and find where it sits, then move it there and mute and un-mute to make sure it sits in the same place. A great hi hat sound shouldn’t feel like its moving and should make the kit sound fuller than without it. I pan the high and low toms hard right and left respectively, while the mid tom sits in the center. If room mics are used they should be panned in alignment with the overheads. Over the years, I’ve developed my general method for EQing drums, which is listed below. These settings can remove some of the muddiness from the kit, deepen the bottom end, and allow the kit to breathe and sound even fuller and more natural. I typically EQ using API 550A’s, but these settings will translate on other EQs as well.
| Kick Outside Mic | Yamaha Sub Kick Mic |
| + 2 dB at 50 Hz | (for extra sub body if needed) |
| + 2 dB at 7 kHz | Shlf(to open the top end) |
| Kick Inside Mic | Sennheiser MD421 |
| + 2-6 dB at 10 kHz Shlf | (to open the top end) |
| 2 dB at 3 kHz Pk | (attack) |
| - 2-6 dB at 400 Hz Pk | (to remove muddy low mids) |
| + 2 dB at 50 Hz | (for extra sub body if needed) |
| Snare Top | Shure SM57 |
| + 2-9 dB at 10 kHz Shlf | (to open the top end) |
| + 2-6 dB at 3 kHz Pk | (to add attack presence) |
| - 2-6 dB at 800 Hz Pk | (to remove muddy low mids if needed but correct tuning will help) |
| Snare Under | Sennheiser 441 |
| + 2-4 dB at 10 kHz | |
| + 2-4 dB at 3 kHz | |
| (ALWAYS check the phase of the top and bottom snare mic and only flip the bottom if it’s out) |
| Hat | Sony ECM-50 (NONE of the newer lavs will work) |
| + 2-4 dB at 15 kHz Pk | (to open the top end) |
| - 2-4 dB at 50 Hz Pk | (always check snare leakage and the move mic closer until the leakage is minimal) |
| Top Toms | Sennheiser MD421 |
| + 2-6 dB at 10 kHz Shlf | (to add attack) |
| + 2-6 dB at 5 kHz Pk | (top tom) |
| + 2-6 dB at 3 kHz Pk | (mid tom) |
| Floor Tom | Neumann U47 Fet |
| + 2-6 dB at 10 kHz Shlf | (to add attack) |
| + 2-6 dB at 3 kHz Pk | (to add attack) |
| + 2-4 dB at 100 Pk |
| OH’s | Telefunken 251’s (when possible, the options are any good pair of tube mics in cardioid, AKG 451, 452’s or Sony C37A’s) |
| + 2-6 dB at 15 kHz shelf | (the amount depends on how dark the room is) |
Drums: The Skeleton of a Track – Part I
Drums are the starting place and framework of a mix, and the track as a whole can only be as big as the skeleton on which is sits. If the drums are small or weak, the track will suffer greatly, but if they’re captured correctly, you’ll have plenty of space to work with the rest of the instruments in the track. So when it comes to drums, the crucial skills an engineer must have are the ability to capture the realness and natural hugeness of a drum set and the ability to mix it even larger.
Capturing the immense nature of a drum kit involves some essential elements that must be mentioned before delving into engineering techniques. The drums need to sound good on their own in the space in which they’ll be recorded. This requires quality drums, tuned appropriately, and played well in an acoustically treated room. Getting to this stage in a home studio setting is a discussion for another entry, so in the meantime, let’s assume we’re recording a session drummer on a killer kit at a studio with a treated room.
My rule of thumb when tracking any instrument is to be sure to capture the way that it sounds (or should sound), and then to allow it to speak in terms of the mix. Drums are the foundation of any mix that contains them, so you really want to end up with a sound that opens the frequency pallet for the rest of the track while laying down the rhythmic skeleton on which the track will sit. Within the kit, each individual drum (kick, snare, toms, hi-hat, etc.) must have a voice of its own, and then they must also come together to form one cohesive kit as a whole. This requires close-micing the kick, snare, toms, and hi-hat in order for each to stand on its own, and then a pair of overheads (and often a room mic in addition) to cover the other cymbals (crash, ride, splash, etc.) and to blend the kit together and also increase the size. Also, room mics should always be balanced so the snare leakage is always centered and if you have the opportunity to look at the overheads on a VU meter they should be at around a -7dbm. The other main ingredient of drums is you must always check phase between mics for size!
When considering what mics to use for the close-micing and where to place them, the goal is to capture the essence of each individual drum the best you can while properly controlling the leakage from the other drums in the set which like I said if done properly will only increase the size and punch of the kit. But, you cannot be afraid of leakage as it helps create size. Example, you’ll always hear some snare leakage in the kick drum mic and also in the hi hat mic. The ratio needs to be 8-10 to 1. Otherwise the balance will be hard to change later if you choose to. You’ll also hear snare, toms, hat and kick in the overheads but again the ratio should be around 3-4 to 1.
Over the years, I’ve had the opportunity to record hundreds of drummers, many of which are the best in the business. My technique for recording them has remained consistent and it has yet to fail me. Here’s a list of microphones I commonly use to close-mic a drum kit, plus the approximate position I begin with, which may or may not be tweaked once I listen from the control room to the drummer playing the whole set in the live room:
Kick (attack): Sennheiser 421 – diaphragm precisely where the middle of the head would be when head is removed. (I NEVER liked the sound of a kick drum with the head on it. It always sounded like a pillow to me)
Kick (low end): Yamaha Sub-Kick – about a foot back from outer head.
Snare Top: Sony C-500 or Shure SM57 – about an inch off the head, coming in from side opposite hi-hat to minimize bleed.
Snare Bot: Sennheiser 441 – at a 45° angle at 1-2 inches off the head.
Hi Tom: Sennheiser 421 – near edge with a slight angle towards the outer edge of the drum 1-2 inches off the head.
Mid Tom: Sennheiser 421 – near edge with a slight angle towards the outer edge of the drum 1-2 inches off the head.
Lo Tom: Sennheiser 421, Telefunken U47 FET or an AKG 414 – near edge with a slight angle towards the center of the drum 2-3 inches off the head and the live side of the mic facing down and away from the snare and hat.
(Also, a very important component of the toms is when listening to the toms in a solo position together, the snare leakage needs to be evenly dispersed between the three or four toms. Again, if you can look at the toms in a solo position on a set of stereo VU’s the left and right leakage should be equal when the drummer is playing kick and snare)
Hi-Hat: AKG 451B, Shure SM57 or a Sony ECM-50PS – hanging about an inch above the top hat, halfway between the center and outer edge close to where the drummer hits the hat (but not in the way and always check the snare leakage into the hi hat mic and the ratio should again be 8-10-1).
When choosing a pair of overheads, I almost exclusively go with a pair of large diaphragm tube condenser mics: AKG C-12’s, Telefunken ELAM 251’s, or the closest available – about a foot apart, several feet above the center of the drum set, angled 45° out from center in stereo configuration.
More to follow on processing, pan-positioning, balancing, mixing, and sub-mixing drums in [Drums: The Skeleton of a Track – Part II](/_posts/2025-01-10-drums-pt2.html).

